
Tooling (beveling and embossing) leather
Tooling is a blanket term used for any time you are making a design in leather. It consists of many steps, but the most important thing to remember is that once you’ve struck, it’s very hard to get a piece restored. You will want to work lightly, building depth and dimension as you go, just like in wood carving. I am going to outline the basic steps herein, however credit for the photos being used in this particular case go to oldfatguy.com since it is difficult to take photographs and tool at the same time.
Preparation of workspace and materials
To begin, you will want to make sure that you have the tools that you will need within reach. You will move back and forth frequently between the tools that you use, so having them close makes life much easier. Things that you will need ninety per cent of the time will be:
~ A cup of water
~ A sponge (any regular non-scrub kitchen sponge will do)
~ Scratch awl, spoon or stylus
~ Swivel knife
~ Embossing and shading stamp(s)
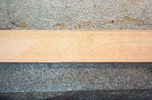
The first step in preparation of the leather itself is to make sure to dampen it. This sounds like a common sense step, but several people tend to start trying to scratch the surface of the leather prior to it being dampened. This will lead to scarring, but you will not be able to read your outlines as well as if the leather is damp as you are using it.
For the initial dampening, soak your sponge in the cup of water, then apply the water to the finished side of the leather. You do not want to soak all the way through the leather, just make it damp. Also, make sure to dampen the whole piece each time you apply water. Applying to only one area can tend to leave water spots in an unattractive manner. If you have applied too much water, let the leather sit for a little while until the natural color has almost returned to the surface.
 Trace your outline
Rarely do I free hand an outline or design. There are several premade templates or patterns that are available in plastic, of which you just rub in a light outline, but mine are mostly custom designs.
I first make a design inside of Photoshop, then print out a copy to scale. I then lay the print out on top of the leather and trace over the outline on the paper with a stylus.
When free handing a design, you can mark lightly with a pencil and trace with a scratch awl, but keep in mind that the graphite will not come out of the leather all the way. Erasing the surface will leave rubber residue as well, which will not accept dye evenly.
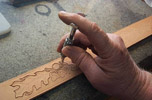 Cut your outline
There are a couple of ways to cut your outline with the swivel knife to get your initial impression. Cutting straight down on the leather will give you a basic line to follow. By tilting your hand at an angle, you are also able to undercut the leather, where it makes an angle you can later pull upward for more dimension. Even still, you can double bevel the leather by cutting at one angle, then going back to cut at the opposite angle to give a larger V shape in the leather.
I generally prefer to stay with a single straight cut or slight single bevel, unless the leather is very thick. It is a personal preference, but I prefer to have less material wrapping upward when tooling.
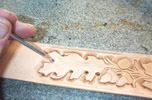 Beveling the Edges
Now comes the fun part. You will want to start your bevel against the edging of the design. Doing so will give you some practice on resistance of the piece of leather before starting into the actual detailed design. Beveling the edge first will also give you something of a guide to work with as you move through later steps in the design. Taking a wider beveling tool, move smoothly and tap softly while moving the deeper part of the bevel in the cut line. Complete one side of the edging, then begin with the other side.
Bevel the Design Outline
Once you have completed your edging bevel, begin on beveling around the larger elements that are in your design. As a general rule, you will want to work from larger tools to smaller in as gradual a progression as possible. If your tool seems to be larger than the space you are going to bevel, or if it looks like your strike will move outside of a line, you can tilt the bevel to corner the angle. Still moving with slow and consistent tapping, work your way around the design until you can see the defined edges of the piece as a whole.
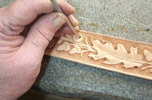
Bevel the Details
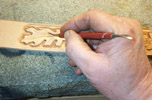 Now that your outline is complete, you will be ready to begin beveling the inside portions of the design. Using a small bevel tool, move from the inside of the design outward to build depth of the piece. In a piece such as this example, you would move from the stem to around the acorn hats so that you do not overlap the bevels themselves. You would then move around the edges of the leaves to make it appear that the leaf is higher than the external stems.
Further Accenting the Details
Once you have the basic details beveled, you will be able to work with finer details. Using a modeling spoon held at an angle, you can rub repeatedly in the direction of a vein in this case to gradually get a fine line detail. If you have undercut the outline around the finer detail, you can press the spoon under the cut and curl it back on itself as well by pulling the cut upward.
 Tool the Background
Now that your design has been beveled, you can begin working the background. You will want to let the leather dry a bit more than it was during the beveling process, but the tooling works in a similar fashion. Using a shading tool, lightly tap around the design that you have just beveled out. Keep your tapping very light and work in tight groupings until you have shaded in the space between the design and the edging.
Even More Accents
At this point, you are very close to being finished. You can now use your swivel knife to get fine line details in place by lightly scoring the surface. You can also use a spoon or shading tool to burnish selected areas by rubbing a small area repeatedly. The friction will not just add more of a rounded edge, but will also add a little darkened color to the piece as friction moves over the leather.
Constructive feedback is both welcome and appreciated, please let me know if I missed some pertinent information or if there's somewhere I can improve.
As always, thanks for reading!
Ihone