Drunken Sailor Doll
Hand carved drunken sailor doll, based on Late 1500’s German Toy Doll Techniques
Project Completed October 22, 2001
Motivation and Inspiration, A Foreword
I often reminisce about my childhood. Many of my early memories remain vivid in my mind, mostly about family. I can remember many times before moving away from my parents’ home hearing my mother singing “Do You Know The Muffin Man” as the scents of freshly baking pumpkin bread wafted through the early morning air. I can remember my grandmother singing “My Bonny Lies Over The Ocean” as she cut out little sailor’s hats from used paper grocery bags. The most vivid memory that I have of both my mother and my grandmother singing was “What Do You Do With A Drunken Sailor”. The occasions of hearing this song raising itself through the air are too numerous to count.
Another thing that I can vividly remember through my childhood is the look on my mother’s face when I gave her something that I made myself, especially for the holidays. No matter how ugly the project was, no matter how piecemeal it may have been, she was always blinded by a mother’s love. Someday, I hope to pass these values to my own children.
So, in my nostalgic reminiscence, I stumbled upon my mother’s birthday gift for this year as well as an A&S entry for Labyrinth. I decided to embark on a month long mission to carve a drunken sailor doll.
The Challenge
Being both pig-headed and a perfectionist, I decided that I would need to set a limitation on myself for this project. I decided that I would in no way use tools that require electricity. I decided that I would also paint and clothe the doll, so that it was a more finished project. In both painting and clothing the doll, I also set out to use no electricity.
The Method to the Madness
I started off with a solid block of basswood that was approximately 12” long by 5” wide by 3 inches thick. My neighbor commented that it looked quite like a section of a 2x4 cut of wood. Basswood seems to be a preferred wood for woodcarving (according to a general opinion from a few woodcarving newsgroups that I researched through), as it is stronger than balsa but still very workable with sharp tools. Having been disinclined to use the older X-Acto blades that I have used for many years, I purchased a brand new set of the woodworking tools from X-Acto.
After having my woodworking materials, I roughly sketched out the placement of the doll’s parts on my block of basswood. I tried keeping the drawings as true to form as possible using the guidelines for sizing human sketches that I had available. After converting all of my doll’s body parts to match the “8 heads tall” rule, I took a trusty old hand saw and began to cut out the blocks of wood around my sketches.
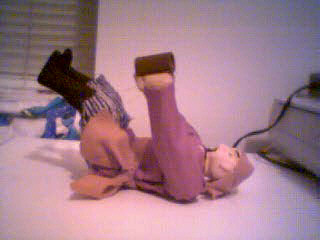
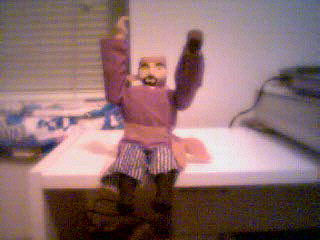
I now had several blocks of wood with pencil marks. It was time to begin carving the blocks into something a little more recognizable. I began with the hands and upper arms. The right hand was left at a semi-open position, as I hoped that the doll would look as if it might be holding up its pants. I carved a mug into the left hand of my doll, trying to further emphasize that he had been drinking far too much. I then moved on to the legs. Originally I had intended to carve my doll barefoot. After looking at the feet further, I decided that stability and sturdiness might be jeopardized if I were to carve feet, so I decided to carve knee high boots into the doll.
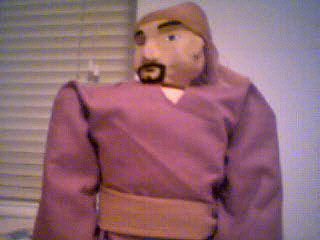
After the arms and legs were completed, I began work on the head. I carved the doll with a large nose, squared off chin, and a baldhead. This would, after all, have to be a pirate doll. After finishing the head, I carved the torso to match the sizes of the limbs and head. The end result was a fairly well proportioned human form. I carved pins from the scrap basswood that I had left that were comparable to the size of small dowel rods (I couldn’t bring myself to take shortcuts) and placed them into the knees and elbows. I created similar pins for the hips before noticing a problem. I had no manual drill. I had to actually use a power drill to get the holes in the shoulders, neck, and hips in place. After all of the pins were in place, I put the doll together and hand sanded the entire doll to remove any grooves from carving.
The Finishing Touches
After the carving and sanding were finished, it was time to give my doll a paint job. I hand painted the body with water based acrylic paints, choosing an apricot color for the skin, black for the boots, black for facial hair and eyebrows, and white and blue for the eyes. After the paint was finished drying, I made some simple breeches, a simple t-tunic, and a matching headscarf and sash. I made the breeches a little loose so that they would slip off of the dolls behind (as every drunk I have ever seen spends time pulling up their pants for some reason). I also left the edges of all of the clothing unfinished so that they would fray and have small strings hanging from the clothing.
I also have carved, sanded, and painted up a small section of the ship’s deck that this little drunken sailor can sit on, and a barrel that he can both lean against (or sit on) and tap for more to drink. I did this because I don’t have the room to transport a full dollhouse sized ship for the little sailor to ride on.
Pride In Your Work
After finishing up the doll, there were a few aspects that I am quite proud of. The first and foremost is that there is no glue, screws, or any other fasteners holding this doll together. The pins that are in use are fit snugly enough to keep the different parts of the doll together without having to use any glue. This makes it easier for the partial articulation of the limbs to not be interfered with. Achieving this took upward of half an hour per pin to get just right, and involved a lot of sanding. Another thing that I am proud of is that this is the first time that I have ever carved a human form. I’ve done a lot of woodworking in the past, but nothing that compares to this level of work. This piece of work is something that I’ll be proud to give to my mom.
Comparing Modern to Period
Through research of dolls, puppets, and the craft of making dolls in the middle ages, I discovered that there were several points of interest that should be mentioned. First and foremost in my mind is articulation of limbs. Von Boehn makes mention that high end dolls (that were often afforded only by nobility) did in fact have articulation (the ability to turn) limbs. From what I can tell of the various illustrations that he includes in his book, this is rather limited at best. Dolls of the period appear to have the shoulders and hips articulated as my doll has. There are a few dolls that had articulated elbows (from what I can tell of the illustrations), but the technique was probably used more in puppetry. Today’s dolls, focusing on action figures in particular, use a style of articulation that closely resembles a higher advancement (through plastic) of movement.
It should also be noted that a more widely used way of painting a doll was with oil-based paint. It tends to seal the wood better than acrylic, and is responsible for keeping the dolls that have survived from period in the shape that they are in today. I only chose acrylic for the simple reason that it was what was available. I also know how to work with acrylics better than oils. The coloring of the doll in period would most likely have been more muted, and subtle than the colors that I chose to use.
There also (from what I can tell) were not many (if any) male dolls used. Von Boehn makes note that girls were more likely to have a doll, and that it was used as a tool to prepare them for later life in some instances. Boys were likely to have played with tin soldiers, or other masculine toys, which would account for fewer male dolls.
Walking the Plank
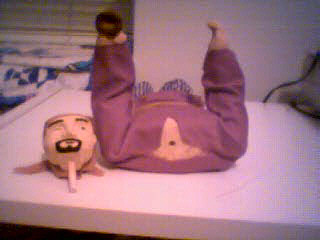
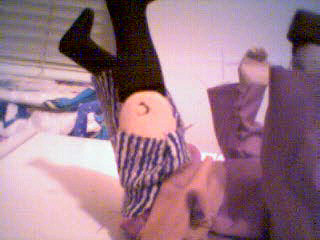
If you decide to pick up my doll, please do so with care, since this is intended to go to my mom at after the event. I realize that some folks are a little timid when it comes to picking up someone else’s A&S projects. With that in mind, I’ve taken a few pictures of how the doll moves, so that you might get a better understanding of the articulation that is involved in my doll.
Project Photos
Click for a larger view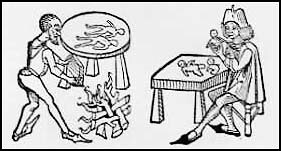

Constructive feedback is both welcome and appreciated, please let me know if I missed some pertinent information or if there's somewhere I can improve.
As always, thanks for reading!
Ihone