Leather Lanterns
Concept out of the back of my head, see where my wild hairs take me?
Project Completed July, 2014
Inspiration Point and Reasoning
 Ok, to be honest, this idea came out of my head instead of a book. Furthermore, I'm not sure on the true period equivalent. The reason I say this is that lanterns had oil or wax flame for the light source and leather burns. With today's technology though, there's no reason that the light source couldn't be artificial (ie an LED Puck Light). Enter the "Creative" in the Society for Creative Anachronism!
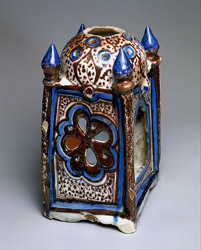
I have seen some gorgeous lanterns, especially in the collections from the Metropolitan Museum of Art. The example to the left is from one of their online collections (click the image to go to the full listing for the piece). The piece in particular is listed as being of Islamic origin from the 13th century. The sculpting and paint is quite intricate, and it just looks very unique to me in overall implementation.
For semantics, on observation (since the Met lets you zoom in really closely to observe detail in their images) there is the obvious vent space in the top (along with an additional photo on the chain assembly for hanging it), but it's not like the hooded or closed lanterns that I'm used to seeing on video games. Instead, it's got some very cool patterns used for additional spaces that light could come through - holes in the top, holes in the sides in varied shapes and the front and back that look like architectural doorways. It's my guess that a short pot assembly was used for the flame on this piece, but that would absolutely be speculation on my part. So I set out to make something different than the same old same old, but using leather instead.
Concepts (yes, there were two!)
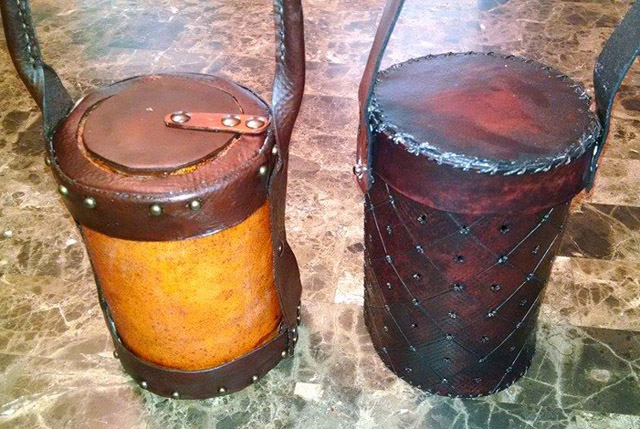
I started off with something rather simple. I wanted to make a lantern from just leather that was a cylindrical shape. Instead of using paper or plastic for the shroud, I wanted to try using rawhide. Then I got a tangent in my head (after seeing the holes in the piece above) about using a solid piece of patterned leather with smaller holes in it to serve more as a perimeter marker.
Stars Lantern
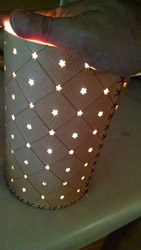
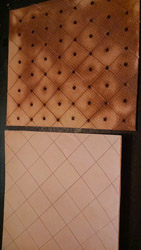 I figured that I would start with (what seemed like) the simpler idea first. I cut out the pieces of 4oz leather as would be done for a cylindrical box. For the patterning, I went with a quilted crisscross look that was first cut in, then shaped with a modelling spoon to take out the harder edges. After that was a matter of punching holes with a star punch that I have at the intersections of the quilted points. I figured that it might limit how much light escaped, so I went ahead and punched in the squares as well. To get the diamond texture in the squares, I also tapped at the leather for a while with a jeweler's hammer so that it wasn't so flat.
Since the piece looked a little rough, I stitched in the edges with a an overlapping whip stitch, trying to give it more character. To keep the top on the body of the lantern, I put in some button studs so that it wasn't too hard to get the lid on and off. What I didn't think of was how floppy the body would be after the fact, so I knew I would have to harden the piece when it was done. When I first put in the puck light for this lantern, it reminded me of the lamp shades from when I was a kid that would put little shapes on the ceiling, so of course I had to show my daughter (and subsequently relinquish the lantern to her after she saw it in the bathroom with the lights off). It wasn't overly bright, so I also glued in some foil to the top and bottom of the lantern to try and bounce the light around a little. I gave it a burgundy antique finish before wax hardening the piece up as well to give it a little depth.
In retrospect, I should have box stitched this piece. I think it would have looked cleaner, even though I was going for a rustic feel. The handle could have been rounded out a little better too, making it a little less floppy. Overall, it's not great light - but it might help out in a port-a-potty in the middle of the night. I think it'll do pretty well as a perimeter marker though.
Rawhide Lantern
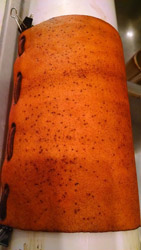
 With the basic flow being easy enough, I upped the ante on the rawhide concept. I started off on the absolute wrong foot - finding out that the stench of using a cut off wheel on a Dremel to cut rawhide will bring up whatever you had for breakfast. Let's face it though, it was an experiment to see if I could cut it efficiently without having to soak a whole piece. At any rate, I got holes kicked in the rectangle of rawhide to lace it up, and just straight wove a piece of rawhide lace I cut (with a knife, not the Dremel) to hold it in place as it dried. So that I didn't lose the form as the rawhide dried, I slid it over a piece of large PVC pipe. Originally, I was thinking to leave it natural, but got a wild hair to put antique on it as well, since I hadn't antiqued rawhide before. I really liked the look of the outcome, it gave it more of a papyrus tone. I beat up the piece as it was stretching over the pipe to give it an additional texture, then left it alone in the heat for a while to set up.
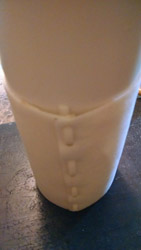
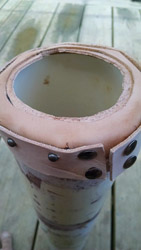
While the rawhide was setting, I started putting together the top and bottom of the lantern. I cheated a little and used some spots to hold the exterior over the bottom's tabs so that it was actually not stitched at all. For the top, I glued together a couple discs as well so that I could put a little lid on the top, instead of having to slide the whole lid off if I wanted to turn the light on and off. For the hinge assembly, I just used a couple Chicago screws to hold down a piece of scrap, then bolted it together.
Once I had the piece together, I went ahead and wax hardened it the same as I'd done on the stars lantern after giving it a saddle tan antique. It added some rigidity to the piece, and sealed all of the leather at the same time. I didn't harden the hinge assembly so that it stayed flexible. When I got it to the bathroom, this one gave off light wonderfully.
In retrospect, I should have stitched this one together too. I hammered out the edges, but the gap in the side straps looks a little sloppy to me. I'd also like to refine the idea of the top, but use less visible pieces so that it looks a little more cohesive. Above all else, I will never, EVER cut rawhide with a Dremel again - I think the stink lasted in my subconscious since completing the project!
Constructive feedback is both welcome and appreciated, please let me know if I missed some pertinent information or if there's somewhere I can improve.
As always, thanks for reading!
Ihone